Do-it-Yourself Kitchen Remodel
Upgrading our Leewood Kitchen
on a Budget
by
Joe Strickland (tjsim@erols.com)
When we walked
into what was to become our home on Leestone Court in 1995, our
realtor's first comment was, "Well, the kitchen needs
updating." I had to agree. The cabinets were a dark
oak with a planked door style more appropriate in a cabin or country
home. The countertops were stained and scratched white Formica.
The appliances were relics of another era. Hanging from the ceiling
was an outdated swag light fixture, and the floor was a stained
and marred vinyl.
Opting to
put off a major renovation to another day, 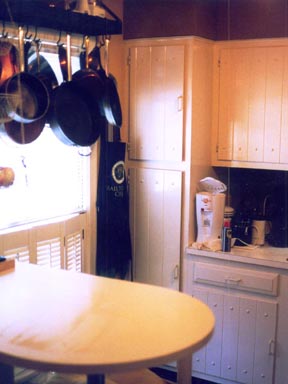 we
gave the kitchen a quick, slap-dash, cosmetic overhaul by painting
the dark cabinets with a high-gloss white enamel, replacing the
light fixture with more functional directional lighting units,
and installing a breakfast bar which attached to one wall - an
Ikea bargain. We laid black and white self-stick Congoleum tiles
(http://www.congoleum.com/)
in a checkerboard pattern. This quick makeover brightened the
kitchen and provided much needed additional counter surface. A
bright coat of paint and at least the room didn't embarrass us
when entertaining. We then turned our attention to other portions
of the house and the back garden which were craving more urgent
attention. we
gave the kitchen a quick, slap-dash, cosmetic overhaul by painting
the dark cabinets with a high-gloss white enamel, replacing the
light fixture with more functional directional lighting units,
and installing a breakfast bar which attached to one wall - an
Ikea bargain. We laid black and white self-stick Congoleum tiles
(http://www.congoleum.com/)
in a checkerboard pattern. This quick makeover brightened the
kitchen and provided much needed additional counter surface. A
bright coat of paint and at least the room didn't embarrass us
when entertaining. We then turned our attention to other portions
of the house and the back garden which were craving more urgent
attention.
The Problem
Well, after
seven years, our other home projects were accomplished and the
time had come for a more complete kitchen renovation, but the
thought of spending $15,000, $20,000, or $30,000 made a major
remodel prohibitive. On close examination, I made the following
determinations:
-
Out of
necessity, over the past 7 years, we had already replaced
the refrigerator, the dishwasher, the range, and had added
an over-the-range built-in microwave. The white appliances
would stay, and thus a major expense would be avoided.
-
The cabinets
were truly ugly, but the cabinet boxes themselves were solid
wood, well constructed, and in the right locations.
-
We were
in need of additional pantry space and cookware storage, as
well as shelves for a sizeable collection of cookbooks.
-
There
was no backsplash over the sink, and the sink was a single-bowl
stainless steel model which was too shallow for heavy duty
entertaining.
Our Solution: Cabinet Refacing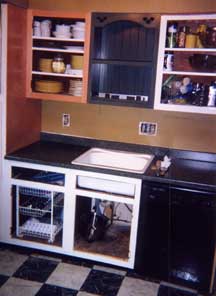
To address
these problems, we chose to keep our existing cabinet boxes and
enhance their appearance with a process called "refacing." What
refacing basically means is to remove the cabinet doors and hinges,
apply a veneer to the current cabinets, and then install new doors.
There are many refacing companies in our area that will do this
work for you. We found their quotes to be approximately half the
cost of replacing the cabinets completely, but more than double
the cost of doing the refacing yourself.
I discovered
that if one is ambitious and handy, the refacing process can definitely
be a do-it-yourself project. Home Depot carries a line of refacing
products manufactured by Quality Doors, a company in Texas. Their
website, http://www.qualitydoors.com,
includes an explanation of cabinet refacing, a description of
their door and wood options, and an order form; however, the order
must be placed through Home Depot or other retail home store -
they will not take direct orders.
For a total
of about $1,600, I was able to order new, 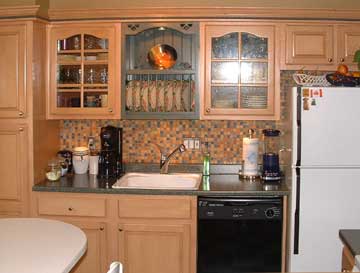 solid
wood maple doors, maple veneer, finished plywood, and all the
hinges and hardware necessary to accomplish the refacing project
on my own. (An additional $500 went into decorative crown molding,
but was a finishing touch and certainly not necessary if one is
looking to save money.) The company offers a variety of door styles,
finishes and stains. They also offer beautiful, yet "virtually
indestructible" RTF (Rigid Thermal Foil) doors and drawer fronts
that are the result of a laminating process that gives the look
of painted wood, but with a toughness and durability paint cannot
provide - perfect if you are in search of the "all white" kitchen
look. solid
wood maple doors, maple veneer, finished plywood, and all the
hinges and hardware necessary to accomplish the refacing project
on my own. (An additional $500 went into decorative crown molding,
but was a finishing touch and certainly not necessary if one is
looking to save money.) The company offers a variety of door styles,
finishes and stains. They also offer beautiful, yet "virtually
indestructible" RTF (Rigid Thermal Foil) doors and drawer fronts
that are the result of a laminating process that gives the look
of painted wood, but with a toughness and durability paint cannot
provide - perfect if you are in search of the "all white" kitchen
look.
Measurements
must be exact for the cabinet doors to fit properly. The company's
literature gives specific and detailed instructions on how these
measurements are to be taken. One must be cautious and exact -
what you order is what you get! After ordering through Home Depot,
the doors and other supplies were shipped directly to our home
and arrived in about six weeks.
The Refacing Process
The process begins
with the removal of all the existing doors and hardware, a process
made simple with the use of a cordless electric drill fitted with
a Phillips bit. The surfaces of the cabinet boxes are given a very
light, manual sanding. Power sanding is discouraged. 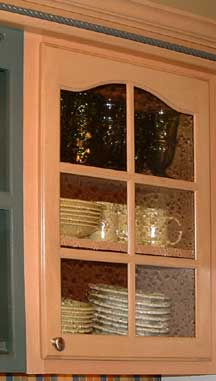 After
sanding, a rubdown with a tack cloth and you're ready to apply the
maple (or oak) veneer. The veneer comes in 8-foot sheets and already
has the adhesive applied to the back. Measurements are made, the
veneer is cut with an Exacto knife, and then carefully applied to
the cabinet boxes. Once applied, it is pressed into place with a
wide putty knife and trimmed with the Exacto knife. (See the picture
above of the work in progress for the sink area -- one cabinet box
has been veneered, the other is still white). After
sanding, a rubdown with a tack cloth and you're ready to apply the
maple (or oak) veneer. The veneer comes in 8-foot sheets and already
has the adhesive applied to the back. Measurements are made, the
veneer is cut with an Exacto knife, and then carefully applied to
the cabinet boxes. Once applied, it is pressed into place with a
wide putty knife and trimmed with the Exacto knife. (See the picture
above of the work in progress for the sink area -- one cabinet box
has been veneered, the other is still white).
Granted,
it takes a bit of work and trial and error to get the veneer process
down. I started in a less-than-conspicuous spot in the kitchen
and learned as I went along. Large sections, such as exposed cabinet
ends and sides, are covered with 3/8-inch finished plywood, rather
than veneer, for a more professional appearance. This is glued
and nailed into place and the nails countersunk, to be filled
in with putty later.
Once the
veneer is in place, the hidden hinges are attached to the doors
into pre-bored locations, and then the doors are attached. The
hinges have adjustment screws which make hanging them level and
straight much easier for an amateur like me.
I ordered
two doors with "lites" for glass. Unfortunately, the doors do
not arrive with the glass installed, so it must be ordered separately.
We ordered a clear, decorative glass for the doors from Virginia
Stained Glass (http://www.virginiastainedglass.com)
on Port Royal Road. They will special order any type of glass
that might interest you and best fit the design of your kitchen.
Plain, clear glass, of course, can also be used and is easier
to locate.
Countertop Options
In addition
to refacing the cabinets, I also replaced our old countertops.
A quote for replacing them with a hard surface material, such
as Corian,
or a natural stone, such as granite, was over $3,000 (prices range
from $50 - 80 per square foot.) 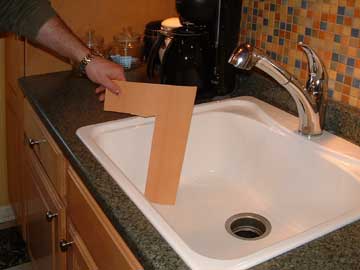 NOT!
I was able to find attractive, post-formed Wilsonart laminate
countertops at Home Depot. http://www.wilsonart.com/
These were less than $150 for the entire kitchen. It's a simple
matter to remove the old laminate countertops. They are held in
place by as few as four wood screws and perhaps a few nails. Installing
the new countertops is equally straightforward, but one must be
careful to level them appropriately with shims of wood. NOT!
I was able to find attractive, post-formed Wilsonart laminate
countertops at Home Depot. http://www.wilsonart.com/
These were less than $150 for the entire kitchen. It's a simple
matter to remove the old laminate countertops. They are held in
place by as few as four wood screws and perhaps a few nails. Installing
the new countertops is equally straightforward, but one must be
careful to level them appropriately with shims of wood.
(Ed: The board
that Joe is holding here is part of the veneer. It was supposed
to show the depth of the sink. The countertops look like granite
and the small tiles in back of the sink and stove -- the backsplash
-- are fabulous).
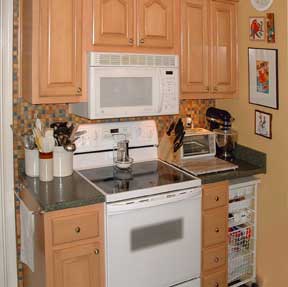
The Finishing Details
I replaced
our sink with a 10-inch deep MoenStone sink. (http://www.moen.com/Consumer/products/kitchen/kitchen_stone.cfm)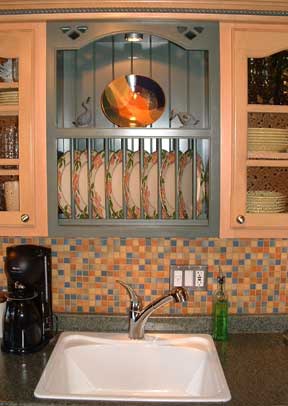 MoenStone
is a composite material made of quartz, granite, and plastics
which forms a hard surface which is resistant to stains and temperatures
up to 450 degrees. MoenStone
is a composite material made of quartz, granite, and plastics
which forms a hard surface which is resistant to stains and temperatures
up to 450 degrees.
My main reason
for selecting the white Moenstone was the fact that I was stuck
with all my existing white appliances and I wanted a uniform look.
I also found stainless steel sinks with the 10-inch depth that
I was seeking. I looked at 2-bowl sinks, but discovered that in
our Leewood kitchens we only have a 25-inch width option. The
only 25-inch wide 2-bowl sinks offered two small bowls which really
didn't meet the heavy duty need of a cook who likes to entertain.
The backsplash
was the easiest part of the entire project. I chose a patterned,
1-inch tile to add color and interest. Standard 4-inch tiles,
or even larger tiles, would have been easier still. Plan your
layout, slap on the adhesive, install the tile, wait a day or
two, grout. It's as simple as that. The truly hard part was choosing
the tile from the millions of options available. An even more
surprising dilemma was choosing the grout color from the dozens
available. (And I thought it only came in white.)
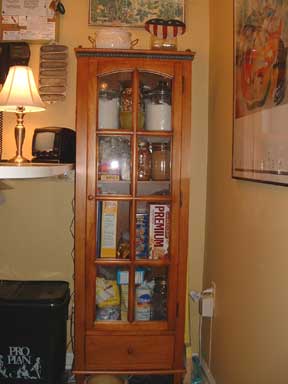
The finishing
touches of this project included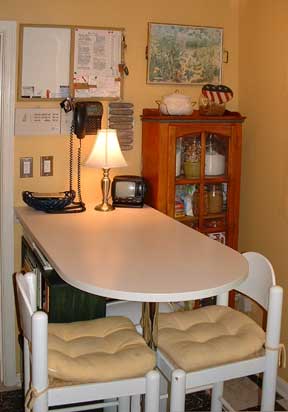 moving the breakfast bar to an adjacent wall, staining a bookshelf
(from an unfinished furniture store), and finding a stand-alone,
glass-front pantry cabinet to provide additional storage. A pot
rack above the kitchen window provides a place for all those pots
and pans, freeing up precious cabinet space for other storage.
A new display/plate rack cabinet was added above the sink to create
a focal point, and under-cabinet lights were added, (again from
Home Depot.)
moving the breakfast bar to an adjacent wall, staining a bookshelf
(from an unfinished furniture store), and finding a stand-alone,
glass-front pantry cabinet to provide additional storage. A pot
rack above the kitchen window provides a place for all those pots
and pans, freeing up precious cabinet space for other storage.
A new display/plate rack cabinet was added above the sink to create
a focal point, and under-cabinet lights were added, (again from
Home Depot.)
The planning
and shopping part of this project took much longer than the actual
execution. It was possible to complete the major phases of the
project in four weekends. It sounds much more ambitious than it
really turned out to be. Thank God for the Internet and Home Depot!
Both were invaluable, and we're fortunate to have three Home Depot
stores within just a few miles. (Plus Lowes is not that far!)
I'm certainly not a carpenter, but merely an avid do-it-yourself'er
who wanted a new look on a budget. It's given new life to an outdated
kitchen and added value to our home. I would estimate that our
total expenses came in under $4,500. (If we had only
refaced the cabinets, the costs would have been about $2,200.)
It's a project than anyone who can cut a straight line or operate
a power drill could accomplish with a little effort and patience.
Ed: Joe put
the bookcase under the breakfast bar so that book clutter is not
a factor when one walks into the kitchen. This also serves to hide
the dog bowls, food, and trash can (as he eliminated the compactor
in favor of more storage space.) 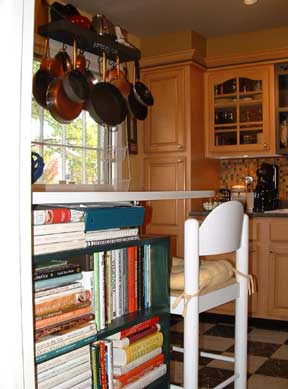
The oven
area has pull out storage units where the compactor used to be.
- - - - -
- - - - - - - - - - - - - - - - - - - -
Additional
Resources:
"Do It Yourself"
http://www.diynet.com/
http://www.bobvila.com/
Cabinet refacing
http://www.tapeease.com/cabinet.htm
http://www.newdoors.com/
http://www.kitchendoordepot.com/
http://www.dura-oak.com/points.html
Kitchen design
http://www.pulsarusa.com/
http://www.millspride.com/
http://www.kraftmaid.com/
Tile http://www.hgtv.com/hgtv/rm_kitch
 Click
for printer friendly page Click
for printer friendly page
|
