How does a professional kitchen designer and an avid cook upgrade a Leewood kitchen?
Our neighbor, Louise Perini, invites us in for a look!
Louise started out by deciding that she had too much equipment in too small a space to ever be able to create a sterile, "unused kitchen" look. So, she incorporated into her design scheme a way for the necessary things to catch and intrigue the eye, introducing color and unusual shapes into her kitchen. The theory is that as you look at all the neat little objects your mind does not register them as clutter, but rather enjoys the various elements. It works delightfully; her kitchen is warm, pleasant, and entirely functional.
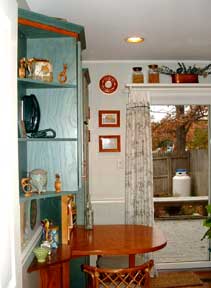
When you first enter you are faced with the side of a new run of cabinets that was added to the kitchen. The angled knick-knack shelves deflect the potential for visual intrusion of the storage into the traffic flow, and beyond, the view through the sliding glass doors is still unobstructed. The new cabinet area includes a flip-down table that has storage underneath it, over it, and on both sides. The flip down design allows for flexibility in the floor space in the kitchen when needed. On the open shelf over the door there is more storage for some canisters plus collectibles. |
 |
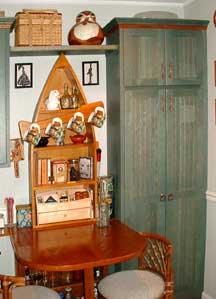 |
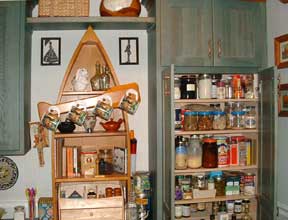
The canoe storage unit above the table adds some humor, interesting lines, and more room for this-and-that. On the right there is a tall cabinet which houses all the cook books and pantry goods. In the left upper cabinet, there is a large tea collection.
|
 |
| From the patio you can get a better overall view of the kitchen than what the more close-up pictures will show. Notice that color (spruce green on the woodwork) was introduced and used throughout the kitchen, which unifies the overall appearance. Reds, copper, and yellow were used as accent colors. The "L" arrangement and original cabinets were kept. Due to budget constraints the intent was to literally recycle every item that was usable and potentially expensive to replace. Doors from the existing cabinets were sometimes switched to another cabinet that was built. The pulls (handles) on the doors are the originals that Louise touched up with copper paint. As she needed to supplement the cabinet hardware due to the added cabinets, new cup pulls were purchased to use on all the drawers. In this way the existing pulls could be used on all the doors for consistency. The sides of all cabinets have what is called bead board paneling attached to them, also green in color. |
 |
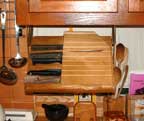 |
To your right as you enter is where Louise does her cutting and chopping. The detail photos of the kitchen show the functionality that can be obtained by using manufacturer's add-ons inside cabinets. The knife rack nestles up and out of the way when not in use, and there is a place where the cutting board can be stored right next to the knives. The knives and cutting board are stored together in one area so that they are handy when cooking without walking to another part of the kitchen. |
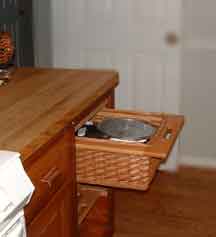
The compactor was eliminated and replaced with an open cabinet built in place, with sliding wicker baskets that hold more kitchen paraphernalia. The baskets are very attractive and their openness adds to both visual interest and convenience.
Most of the original shelves were replaced as they were sagging. Louise just used plywood for the new shelves, and then wet-sanded it with Watco oil, finishing the shelves with a coat of shellac. The result almost looks like burled wood. She replaced the plastic edging of the shelves with a strip of wood moulding staining it to match the cabinets themselves. It provides a much richer look than what was originally on our Leewood cabinets.
(Click here for more detail of the cabinets in this region). |
 |
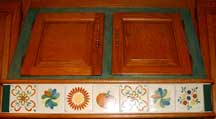 |
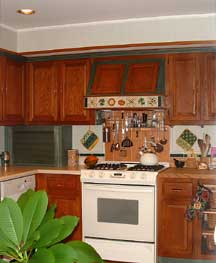
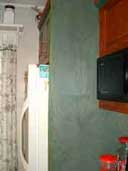
Moving to the stove area, you see what was one of my favorite spots. The metal hood that was standard over the stove still worked but did not do anything for the esthetics of the kitchen. Louise had the hood area boxed in (she calls this a surround), and placed the doors that were originally on the cabinet above the stove onto the angled wooden hood. The exhaust fan still works; it is only the exterior that was changed. Louise added the ceramic tile and matching nosing around the edge of the hood to finish off this look. The amount of storage over the stove was increased, and definitely the wood hood moves the kitchen out of the ordinary in looks! |
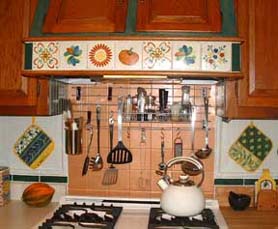 |
In back of the range, Louise has hung tiles and the utensils needed when cooking. Tiles are a very practical addition to the backsplash areas of our kitchens behind the stove and sink. These tiles are stick-on copper tiles (which of course go with the copper pulls throughout the kitchen). However due to the heat the stove would generate, she actually used mastic to set the tiles on the wall. The convenience of the most-used utensils being hung right where you need them is great, and although yes, they do get a bit greasy isn't that what dishwashers are for?
|
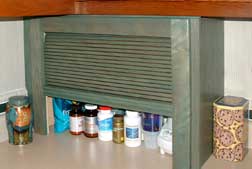
| There is an appliance storage unit with a roll top door in the generally hard-to-use space created by the "L" in the counter top. This has a blender in it, plus some bottles and bags of chips, etc. Notice the color is the same green that she introduced into the woodwork of the kitchen. |
 |
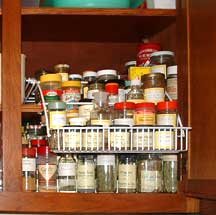 |
Her spice cabinet has a pull-down rack so that spices are more readily available. If you look closely you can see more spices below this pull down unit. These are on a tiered unit so all of them can be seen more easily.
|
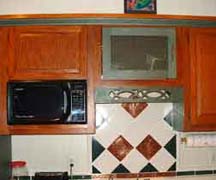
Continuing counter clockwise, we arrive at the sink area. Again tiles are used for the splash, though here they are set diagonally because the decorative copper tiles she chose had a diagonal embossed pattern. The repetition of the copper and the rope tile border that follows the entire counter unifies the two tiled areas. Directly over the sink is a cutout wood light valance that adds interest and lets the light filter through.
The microwave unit is housed within a cabinet to the left of the sink, with provisions made inside the cabinet area for ventilation of heat. The microwave thus is at a more usable height for the "shorties" in the crowd than the over-the-stove models that I have seen. |
 |
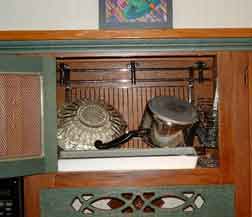 |
The cabinet over the sink contains a dish drainage unit that Louise purchased at IKEA. Apparently in Europe these are common, and people just place their wet dishes or pots in them, letting them drain into the sink below. As Louise wanted a light below the cabinet, she has slipped a plastic tray inside, under the unit to catch drips, and she installed a piece of metal grillcloth in place of the center panel so moisture would not build up. The pots dry and are off the counter. To me, the grill door was a design feature also as it added another texture to the kitchen.
(Click here for more on the sink/microwave and the beadboard used throughout)
|
|
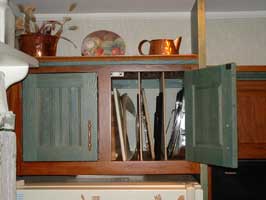
Next you will see a large vertical panel which hides the side of the refrigerator. This panel is also the basis of a very interesting solution to the problem of storage over the refrigerator that Louise recommends to most of her clients. The standard depth cabinet over the refrigerator that builders put in is hard to access except, perhaps, for giants. She pulled it out and deepened it. It is just a little back from the front of the refrigerator, is accessible, and is deep enough that she can now store cookie tins, trays, etc., vertically. This is facilitated by the vertical dividers she installed in the cabinet, and although you couldn't reach to the back of the cabinet, there is no need to do so with it being used in this manner. Even a 5"3" person can use it for long objects without requiring a stool. |
 |
 |
We have now made a full circle of the kitchen, and are back to the sliding glass doors with the storage and decorative items above. |
You might have noticed in the first picture of the kitchen, looking out to the patio area, a large liquid propane tank in the rear yard. Louise wanted a gas stove. Those who have tried to get gas into Leewood have noticed that somehow the gas company is not particularly enthusiastic about doing this. She would have had to replace all of her appliances with gas (water heater, etc.) to get a reasonable price on the installation. Instead, she bought a gas stove that is convertible to propane. Now, from the voice of experience, she would recommend that if anyone else takes this approach that they buy a stove that is particularly specified to run on liquid propane. Apparently LP burns hotter than gas, and all the burners and the oven flame ports have to be reset in order to correct the combustion. Theoretically the stove she purchased was supposed to be "convertible" for LP, however the adjustments did not work perfectly, and one burner is still burning improperly.
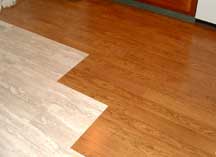 The floor is Pergo. The design in the center is of the same Pergo pattern that she used in the entrance hall and hallway to the kitchen. Louise does warn, however, that Pergo is not impervious to water as is vinyl flooring or tile. When she had her new dishwasher installed the plumber incorrectly tightened the water supply and she had a flood. Unfortunately that caused the flooring to warp. The damage was covered by the plumber's insurance, but that is something to remember when one makes the choice of flooring. Talking about dishwashers, I have never heard one as quiet as the dishwasher that she has. I don't know whether it is the brand (Bosch) or that they have just gotten a lot quieter in the years since mine was made. You can easily carry on a conversation with the dishwasher going -- amazing! The floor is Pergo. The design in the center is of the same Pergo pattern that she used in the entrance hall and hallway to the kitchen. Louise does warn, however, that Pergo is not impervious to water as is vinyl flooring or tile. When she had her new dishwasher installed the plumber incorrectly tightened the water supply and she had a flood. Unfortunately that caused the flooring to warp. The damage was covered by the plumber's insurance, but that is something to remember when one makes the choice of flooring. Talking about dishwashers, I have never heard one as quiet as the dishwasher that she has. I don't know whether it is the brand (Bosch) or that they have just gotten a lot quieter in the years since mine was made. You can easily carry on a conversation with the dishwasher going -- amazing!
Clearly knowing the business, what was available and functional, plus a truly artistic eye helped in making this kitchen the useful and attractive place that it is. Thanks, Louise, for the guided tour!
(Interview and pictures by Judy Currier)
|
